Saturday, March 28, 2015

Lowered and Motored

 A few good things happened this week.

  • Motor/transmission marriage
  • Motor installation
  • Front suspension finalized
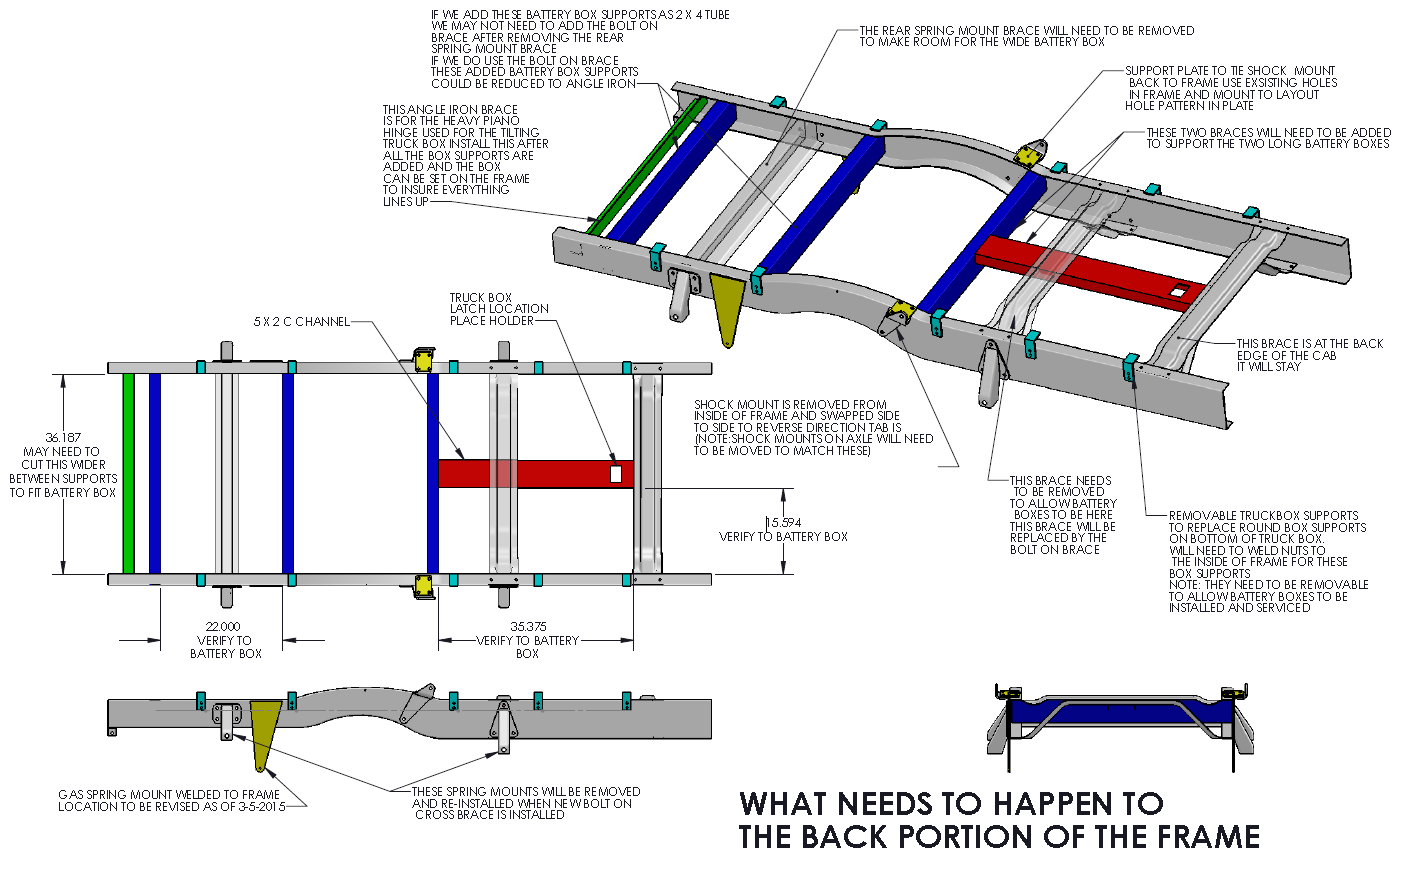
  • Battery boxes fabricated
  • Color plan established
  • Frame cross member removed


After Duane and Peter coated the adapter plate with Alodine to prevent corrosion, the motor could finally be married to the transmission.

To the upper right you can see (from bottom to top) the motor, adapter plate, and the flywheel/clutch assembly.  The tricky part was to make sure that the motor shaft and transmission shafts are close to touching, but not quite.

Turns out that Jon had it figured right!  Perfecto.

Jon & John wrestled it all together.  Here it is, ready for installation.


Ben and David wrapped up the lowering of the front end.  It was an amazing transformation  when we set it on the ground.  It looks tuff man! (that's 70's tuff).

Jason and Rob are coming to consensus on color.  White with orange details (roof, transmission, graphics).  Interior of the engine compartment, cab, and bed will be gray.

This next week should see the fitting of the battery boxes and welding in of new cross members.  Rob and Jason are also committed to getting the gray painted.

I will also be ordering the final bits of HV stuff. Once the boxes are in, we can try running this baby!


Jason & Rob discussing color

The Friday Stude Group discussing rear suspension


Saturday, March 21, 2015

Orange

My first selfie
I had a treat last Saturday that I must share.  I experienced, for the first time, the acclaimed largest urinal in the midwest.  It was almost life altering.  I highly recommend it to others.

Less awe inspiring, but more pertinent to this blog... progress this week.

John Smith has the battery chargers mounted under the cab.


Painted transmission, flywheel, adapter plate, clutch, and metal for chassis mod


I'd have to say the biggest effort was by Dave Bauer.  He machined (several times) parts to allow the front springs to be supported under the axle instead of above.  He and Ben have it almost licked.


These blocks keep the axle from 'spinning'.  It turns out mating machined blocks mating to cast axles are hard to measure.  After a bit of rework though, they look and fit great.  I'm anxious to see how the truck sits.


Peter has been collecting cooling system parts.  At the moment we plan to use the original heater core as the radiator.


To round out the week, here is Greg's latest cad drawing which shows battery boxes and cable routing.  The boxes are on order and due next week.  A quick powder coat and they will be ready to be installed.  Still hoping to be road worthy in May (2015).


Sunday, March 15, 2015

Front end and chargers

Not much picture wise this week.
  • Ben and Dave have been working to lower the front end.  It's going great, they are fabricating some new parts to make it all come together.
  • Greg has finalized the battery box designs for the back three boxes.  Parts go on order Monday!
  • Received delivery of the battery chargers and 300 to 12 VDC converter from EVTV.
  • Received the Bluetooth enabled Retro Radio.
  • Working on the schematic now.
In other news, I've spent the day working on how to wire everything up.  It is a bigger job than I expected.  Lots of choices and many considerations for safety from the high voltage.

Starting from the wall.  I plan to use an Electric Motor Works Juice Box Pro Plus 40 (quite a mouthful).  From there, the connection will be via the former gas filling spigot via a J1772 plug.  I will use a little AVC2 controller because it has the little bits of circuit to enable the J1772 circuits.  And finally from there to the dual Lear Chargers.

I've begun a schematic using Design Spark software.  It's freeware and pretty good.  It's taken a bit of time today to learn it, but I like it so far.  Here is a crude start.  Nothing to be proud of yet, but it shows the big pieces of the high voltage system.  Of course you can't hardly read them... something for next week.


That's it for this week.  More next time.

Saturday, March 7, 2015

Motor assembly

WATCH THIS! Filmed at bb7.

   
Thanks Rob


We have our first major custom part machined!


Here is the motor adapter plate.  It connects the electric motor to the Studebaker transmission.  Jon did all the calculations, and fitting to design the plate.  The tricky part is to make the motor and transmission shafts line up perfectly and just 1/4" between them.

The CAD model is shown to the right.

I have put cool 3D pdfs and e-drawings here.


Motor Adapter Plate - 2" thick aluminuminum

And here is the part that Larry made.  Click to zoom, it's a beautiful picture taken by Bryon.

There are some other pieces that Mark made to attach the flywheel to the motor.  Then Jon took that assembly to a specialty shop to be balanced.  It wouldn't do to have this thing vibrate apart.

The whole thing when together perfectly.  I'll have a picture next time.


 The group also spent a lot of time discussing battery placement.  It's one of the most difficult issues to grapple with if you want to hide them.  Our goal is to make the truck look as normal as possible until you look under the skin.  That means finding homes for 1200 lbs. of batteries.

Greg has done a great job modeling up various ideas.  The drawings below sum up where we are.  The process will involve removing some key frame members and replacing them with new assemblies (so the wheels won't fall off).


Ben and Dave started lowering the front end on Friday.  They will take the leaf spring that sits on top of the front axle and put it under the front axle.  It's a pretty easy process except for the fact that the bolts have been tightly in place for 55 years.  Dave was really working up a sweat.

Finally, Duane and I dropped the assembled motor/transmission into the truck.  That was great fun to see how small the motor is.  Here's a picture.